

Always wanted a comprehensive guide for Office 365 tenant to tenant migration without tool?
User’s Query:
Because of a recent merger between my organization and another, we need to move all of our company’s data to the other. I want to accomplish this task without the use of a third-party tool. As a result, I’m searching for a step-by-step procedure for performing an Office 365 tenant-to-tenant migration. This is a challenging task for me, but I need to move the mailboxes of 200 users to another tenant. Can you help me or guide me in the correct direction?
Scenario:
Every second organization in the globe relies on Office 365 due to the simplicity of use and flexibility it provides to its users.
As a result, when two organizations merge, it is common for both to utilize Office 365, necessitating the requirement to transfer data from one Office 365 tenancy to another.
As a result of the rising number of Mergers, Acquisitions, and Divestitures, companies must deal with a variety of data migration initiatives in Office 365.
You should be aware that there are primarily two methods for doing data migration in O365. The first way is to use PowerShell Scripts manually, and the second is to use an automated solution.
Because you want to transfer the data without using a tool, I’ll go over the manual tool in depth before telling you about your alternative—an automated solution.
How to Migrate from Office 365 Tenant To Tenant Migration without Tool?
PowerShell is a Microsoft concept that includes a command-line shell and a scripting language to automate operations. This approach is difficult for non-technical person to understand.
There are a few prerequisites you need to take care of before performing Office 365 tenant to tenant migration without tool. They are:
A. Preparation of the Domain
Domain preparation entails the following steps:
- Ascertain that you have sufficient Microsoft 365 licenses.
- Form admin accounts in the source and the target systems to get an easy transfer.
- In the destination, add new mailboxes, room/resource mailboxes, and distribution groups.
- Use AD DS tools to perform AD DS consolidation and, if needed, manually or automatically synchronize the source and the target domains.
- Following the transfer, train your end customers on how to utilize Microsoft 365.
B. Domain verification
- Start by entering the target tenant domain into Microsoft 365 and validating it.
- Set up DNS TXT records and attach a source domain to the destination Microsoft 365 admin center.
- Ensure that the domain is only used by one tenant. The verification will result in faliure if this situation is not met.
Following the completion of these processes, the change will take around 72 hours to become apparent.
C. Migration Scheduling
- Make a list of the user mailboxes to be relocated, as well as a CSV file for mapping.
- Take note of the lowest TTL value in the MX record (of the primary email domain).
- Disable directory sync for the origin tenant to prohibit changes to the source tenant’s AD DS account from being synced to the Microsoft 365 platform (through the Microsoft 365 admin center). It’s conceivable that the deactivation process will take up to 24 hours to complete.
D. Migration Stage
1. Put a stop to the inflow of mail.
Change the primary MS record to an unreachable value or use a third-party solution to block inbound mail flow to the originating tenant. Because you entered the lowest value of TTL on the MX record (of the principal email domain) during the preparation phase, you can simply schedule the time for this step in order to perform Office 365 tenant to tenant migration without tool.
2. Tenant preparation source
The primary mail domain should be deleted from all objects in the originating tenancy before transferring the Office 365 mailbox to another tenant.
- Reset the default email address to the email address associated with your Microsoft 365 account.
- Remove all Lync licenses from the source tenant using the Lync Admin Portal.
- Restore the previous domain’s default email address for distribution lists, rooms, and resources.
- The secondary email address for all tenant objects should be deleted.
- In Windows PowerShell, type Get-MsolUser -DomainName xyz.com to find any objects that are still using the primary email address or resisting removal.
- Preparing the target domain
- Configure the auto-discover CNAME.
- When utilizing AD FS, you must create a new domain in the target tenancy.
- Activate and assign license to the target domain’s new user accounts.
- Make the source domain’s primary email address the primary email address for new users (done using Windows PowerShell). Make a choice on how to communicate passwords to end users.
- Once the user mailboxes are active, change the mail routing and point the MX record to the new Office 365 email address.
- Analyze the mail flow into and out of the targeted tenant.
- Steps to Perform Office 365 Tenant to Tenant Migration without Software
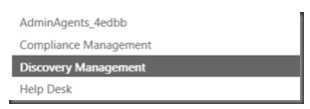
You should be aware that you must be a member of the Discovery Management Group in order to run the PowerShell scripts. Certain PowerShell cmdlets are otherwise inaccessible. For example, Search-Mailbox.
Step 1: Connect to Exchange Online using PowerShell.
Step 2: Execute the following script to locate and copy messages from user A to user B in order.

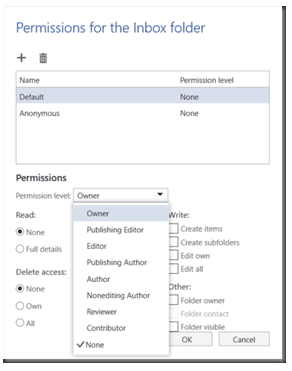
Step 3: Log in to their Office 365 OWA account, right-click the top-level folder, and choose privileges.
Step 4: Add the individual who needs access and choose the appropriate permission level. To export to, the user’s mailbox will show in the destination user’s main profile. Pst to perform tenant to tenant migration in Office 365 without tool.
Note:
- Move the mail calendar and contacts to the destination tenant mailbox separately if you have 500 or fewer users. Any condition, such as a date, can be used to limit the transmission of emails.
- You can only send contacts, calendars, and data for one week at a time. You can only transmit contacts, calendars, and a week’s worth of data at a time.
Why not to Perform Tenant to Tenant Migration in Office 365 without Software?
- This might take some time.
- It takes at least a second or two to process each file or folder. If your leaving user has tens of thousands of files and time is of the essence, you may want to try a different technique.
- It takes advantage of your internet connection.
- It saves the files to the user’s OneDrive before uploading them to the other user’s OneDrive. If your internet connection is sluggish and you’re transferring huge files, you might want to leave this running on a cloud-hosted server.
- It cannot transfer files greater than 250MB.
- This PowerShell module has a restriction in that it cannot transfer files greater than 250MB to SharePoint. This script will detect these files and store a list of them to c:templargefiles.txt in case you want to move them manually.
- There is no two-factor authentication.
- This script is incompatible with multi-factor authentication on the admin account. You could wish to set up a temporary admin account without MFA for this reason.
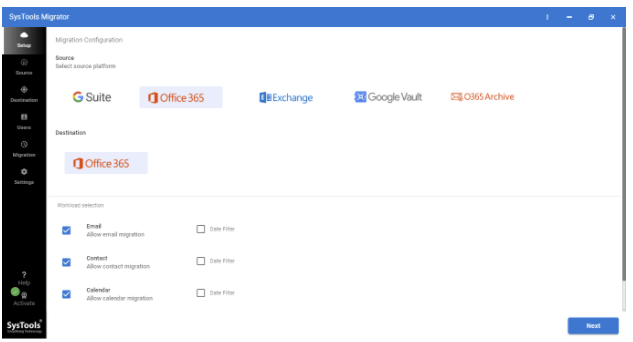
Please note: So, this was all about the manual approach using the PowerShell scripts, however, if you feeling overwhelmed while going through this tedious process then, you can go for an alternative solution i.e. Office 365 to Office 365 Migration Tool. The entire Office 365 tenant user mailboxes can be migrated using this tool. Also, the program offers a date filter option to assist you to save time while transferring data.
Wrapping Up
The query of the user “How to Perform Office 365 Tenant to Tenant Migration without Tool” has been solved in this article. Users can simply use the PowerShell script method to do the migration manually, but the method is complicated. Therefore an automated tool is also suggested here.
Hi Calvin,
Thanks for sharing this amazing post. I am glad that I dropped to your page. I really appreciate your effort in crafting this post.
Keep up the good work.
Have a good weekend.