Losing important files can be frustrating, especially when you have worked on it for hours just to realise that you missed saving the file or that it has been replaced by another file with the same name. Therefore, you need to have “save early and save often” approach to prevent your data from being lost.
How many times while saving a file, you have accidentally pressed “SAVE” instead of “SAVE AS”? That rings a Bell? Isn’t it! Well, the majority of us do that unintentionally and end up replacing the existing file with a new one! That’s why it’s also very important to transfer data carefully.
File replaced by another file can be an issue!
The other day, I was preparing a Statement of Purpose (SOP) to apply to different universities. Of course, SOP is important, as no college will absorb you if you don’t have a purpose. It reflects your thoughts, attitude, and personality; in short, it speaks a lot about yourself. That said, after devoting a day or two, I managed to come up with the best. However, while saving another file, I accidentally replaced my SOP with that file, and that poured cold water on all my efforts.
In my case, it was the SOP; other instances could be your important word files, Power point presentations, spreadsheets, or other official documents, business quotations, soft copies of your critical data, resume, photos of your beloved pet, etc. So that leads us to the question “Is it possible to recover files replaced by another file with the same name?” The answer is “Yes!”
If you ever faced such instances, you can follow the same course that I had followed. I tried some workarounds before opting for a file recovery software.
How I recovered my replaced file
OPTION 1: Recover from previous versions
- As Windows saves the previous version of files, it is possible to recover the replaced files. Here’s how: Go to the folder which contains the replaced file.
- Right-click on it, select “Properties” and click “Previous Versions “tab.
- The screen will display the list of available previous versions of the file, select the required one and save it.
Unfortunately, in my case, the screen displayed the message “There are no previous versions available” and so I had to proceed to the next step.
OPTION 2: Restore from system restore point
You can restore files from the system restore point. This process takes the system to an earlier point in time from where you can recover the required files. Follow the below-stated steps:
1. Go to “Control Panel” and select the “Recovery” option.
 2. From the given options, select “Open System Restore” and click “Next”
3. Choose the required restore point and click “Next” < “Finish”.
*Note: To restore files from the system restore point, you need to turn the system protection feature. For that, under “Recovery” option, select “Configure System Restore” < “Configure” < “Turn on system protection”.
Alternative method: Select “Control Panel” < “System” < “System Protection” and click OK.
Still, I wasn’t able to recover the file replaced by another file with the same name, and with that, opting for a file recovery software was the last resort.
OPTION 3: A File recovery software worked for me
Given that the earlier steps were not of much help, I decided to opt for a file recovery software to recover the replaced file. After searching the internet to choose a reliable software to recover my file, I found Stellar Phoenix Windows Data Recovery – Home to be the best bet.
The recovery process was straightforward and did not require any technical know-how. The following steps describe the process:
1. Install and run Stellar Phoenix Windows Data Recovery – Home and select “Documents, Folders & Emails” option. Moreover, you can make the option simpler by specifying the type of data whether it is Office Documents, Folder and Emails. After specifying the data type, press “Next”.
2. Now, select the location where the file was. It could be the C drive or any other connected storage media. After selecting the location, press “Scan”.
3. The file recovery software will scan the drive for the files. It also displays the scanning status.
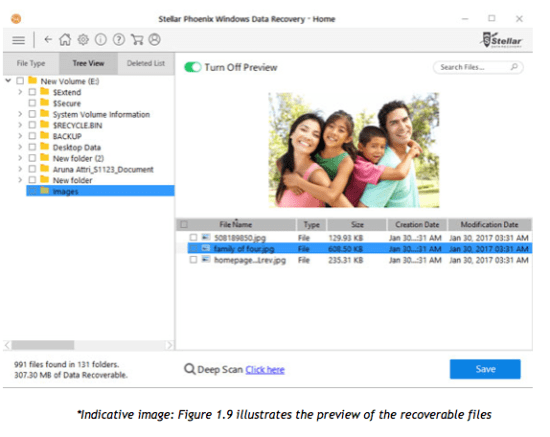
4. You can preview the file during the scanning process by clicking “Turn On Preview”.
5. After the scanning is over, view and sort the result and click “Save” to save the files.
I recovered my files using Stellar Phoenix Windows Data Recovery – Home and have included in my list of keeping the data safe. Although I regularly take backup of my important files as there is no harm in having more option, isn’t it? The more the options are the better it is.
The Bottom Line
Recovering a replaced file is not a rocket science. The best way is to explore all the other amazing options and then implementing the recommended ones. Different scenarios call for different solutions; therefore, it is not necessarily that what works for others may work for you.
Explore all the other amazing options to recover lost or deleted or replaced files, one being using Stellar Phoenix Windows Data Recovery – Home.
In what other ways you can recover data? Feel free to drop in the comment section.


its scam don’t waste you’re time
I wish i had seen thesw comments before. I forgot to turn on system protection. Now my system is in restore mode and won’t recover
time-wasting, the software is free but the recovery option isn’t.
In my case the software didn’t work. It recovered the same file which was accidentally replaced and saved in my drive